前項Apache/SSLサーバ導入手順に続き、自己サーバ証明書を導入して起動するまでの手順を示す。通常はCentOSデフォルトで用意されているlocalhost証明書で充分用が足りるはずなのでこの項は必ずしも必要ではない。
SSL/TLSサーバ証明書の配置場所と作成コマンド
https通信を必要とするWebサイト/アプリの開発では以上の作業を行えば充分用が足りる。次は自己サーバ証明書を自作しそれを用いてWebサーバを設定する手続きを練習してみよう。
SSL/TLS証明書を得るには openssl コマンドで秘密鍵と証明書のセットを作成する必要があるが、この作業を簡略化する Makefile が openssl パッケージとともにインストールされているので、ここではこれを使用する。これは /etc/pki/tls/certs に配置されている。
[root@localhost ~]# cd /etc/pki/tls/certs/
[root@localhost certs]# ls -la
合計 1780
drwxr-xr-x. 2 root root    4096  2月 20 12:41 2015 .
drwxr-xr-x. 5 root root    4096  2月 20 11:03 2015 ..
-rw-r--r--. 1 root root    2242  1月 21 02:32 2015 Makefile
-rw-r--r--. 1 root root  786601  7月 14 23:55 2014 ca-bundle.crt
-rw-r--r--. 1 root root 1005005  7月 14 23:55 2014 ca-bundle.trust.crt
-rw-------. 1 root root    1541  2月 20 11:29 2015 localhost.crt
-rwxr-xr-x. 1 root root     610  1月 21 02:32 2015 make-dummy-cert
-rwxr-xr-x. 1 root root     829  1月 21 02:32 2015 renew-dummy-cert
ここで例えばmake develop.crtを実行すると、秘密鍵develop.keyと証明書develop.crtのセットを作成することが出来る。質問事項のうち秘密鍵を作成・参照するためのパスフレーズは必須、Organization Name(ここではDEVELOP)とCommon Nameの入力(ここではlocalhost)は必要だが、その他は規定値で構わないので空ENTERでもよい。
[root@localhost certs]# make develop.crt
umask 77 ; \
    /usr/bin/openssl genrsa -aes128 2048 > develop.key
Generating RSA private key, 2048 bit long modulus
.............................+++
...........................................+++
e is 65537 (0x10001)
Enter pass phrase:********↩
Verifying - Enter pass phrase:********↩
umask 77 ; \
    /usr/bin/openssl req -utf8 -new -key develop.key -x509 -days 365 -out develop.crt -set_serial 0
Enter pass phrase for develop.key:********↩
You are about to be asked to enter information that will be incorporated
into your certificate request.
What you are about to enter is what is called a Distinguished Name or a DN.
There are quite a few fields but you can leave some blank
For some fields there will be a default value,
If you enter '.', the field will be left blank.
-----
Country Name (2 letter code) [XX]:JP↩
State or Province Name (full name) []:Tokyo↩
Locality Name (eg, city) [Default City]:Chiyoda↩
Organization Name (eg, company) [Default Company Ltd]:DEVELOP↩
Organizational Unit Name (eg, section) []:↩
Common Name (eg, your name or your server's hostname) []:localhost↩
Email Address []:↩
[root@localhost certs]# ls -l develop.*
-rw-------. 1 root root 1261  2月 20 13:18 2015 develop.crt
-rw-------. 1 root root 1766  2月 20 13:18 2015 develop.key
出来上がったdevelop.crtの署名情報を確認してみると-subjectと-issuerの中身が同一なので自己証明書である事がわかる。
[root@localhost certs]# openssl x509 -in develop.crt -noout -subject -issuer -dates
subject= /C=JP/ST=Tokyo/L=Chiyoda/O=DEVELOP/CN=localhost
issuer= /C=JP/ST=Tokyo/L=Chiyoda/O=DEVELOP/CN=localhost
notBefore=Feb 20 04:18:44 2015 GMT
notAfter=Feb 20 04:18:44 2016 GMT
次にパスフレーズを削除した秘密鍵を/etc/pki/tls/private/に作成し、パーミッションを落としておく。1
[root@localhost certs]# umask 77; openssl rsa -in develop.key -out ../private/develop.key
Enter pass phrase for develop.key:********↩
writing RSA key
[root@localhost certs]# ls -l ../private/
合計 8
-rw-------. 1 root root 1679  2月 20 13:21 2015 develop.key
-rw-------. 1 root root 1679  2月 20 11:29 2015 localhost.key
[root@localhost certs]#
自作したSSL/TLSサーバ証明書でWebサーバを起動する
これで秘密鍵と証明書が用意出来たので、httpsサーバ設定/etc/httpd/conf.d/ssl.confの該当項目2箇所を書き換える。またこのファイルの中にもServerNameを指定する箇所があるが、いまは何もしなくても良い。
#ServerName www.example.com:443

#SSLCertificateFile /etc/pki/tls/certs/localhost.crt
SSLCertificateFile /etc/pki/tls/certs/develop.crt

#SSLCertificateKeyFile /etc/pki/tls/private/localhost.key
SSLCertificateKeyFile /etc/pki/tls/private/develop.key
あとはconfigtestで書き換えエラーがないのを確認してサービスを再起動するだけだ。
[root@localhost conf.d]# service httpd configtest
Syntax OK
[root@localhost conf.d]# service httpd restart
httpd を停止中:                                            [  OK  ]
httpd を起動中:                                            [  OK  ]
[root@localhost conf.d]#
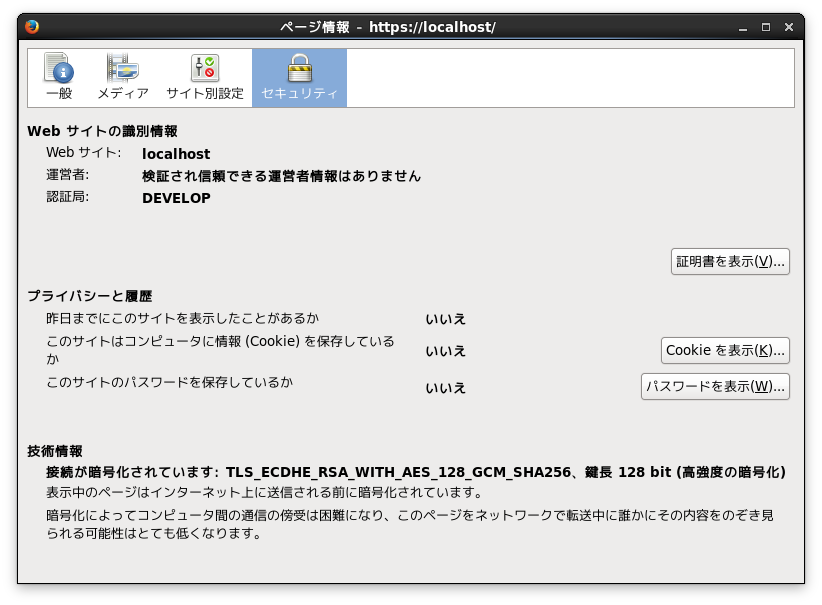
ブラウザでふたたびhttps://localhostを閲覧して証明書の内容を確認してみると、認証局の位置に先ほどOrganization Nameに入力した文字列 DEVELOP が表示されているだろう。
ここではumaskコマンドを前置してopensslコマンドの出力段階で不要なパーミッションを落としている。 ↩